Highly separated Talos Kubernetes Cluster: Part 4 - Talos Cluster installation

In this part, we install Talos on Proxmox VMs, bootstrap the cluster, enable networking with Calico, and prepare HAProxy Ingress in external mode.
Prerequisites
Before starting, make sure you already read through the other blog posts of this series:
- A reachable and configured Proxmox environment
- The PFSense server installed and configured
- The Registry server installed and configured
- The Management client with
talosctlandkubectl - The Talos installer image URL from your previous Talos Image Factory installation step
Required config patches
Before we can install the Talos cluster we need to create patches for the generic installation step. Those changes reflect the on premise registry as well as the lab environment:
#lab.yml
machine:
  install:
    disk: /dev/sda
cluster:
  network:
    cni:
      name: none
  discovery:
    enabled: false
---
apiVersion: v1alpha1
kind: ResolverConfig
nameservers:
    - address: 10.10.100.1
searchDomains: # optional
    domains:
        - srv.lab.internal
    disableDefault: false
---
apiVersion: v1alpha1
kind: TimeSyncConfig
ntp:
    servers:
        - 10.10.100.1
---
apiVersion: v1alpha1
kind: TrustedRootsConfig
name: registry-ca
certificates: |
  -----BEGIN CERTIFICATE-----
  "BUT in your ca.rt from the HARBOR installation"
  -----END CERTIFICATE-----
#registry_mirror.yml
apiVersion: v1alpha1
kind: RegistryMirrorConfig
name: docker.io
endpoints:
- url: https://registry.mgmt.lab.internal/v2/proxy-docker.io
overridePath: true
---
apiVersion: v1alpha1
kind: RegistryMirrorConfig
name: ghcr.io
endpoints:
- url: https://registry.mgmt.lab.internal/v2/proxy-ghcr.io
overridePath: true
---
apiVersion: v1alpha1
kind: RegistryMirrorConfig
name: gcr.io
endpoints:
- url: https://registry.mgmt.lab.internal/v2/proxy-gcr.io
overridePath: true
---
apiVersion: v1alpha1
kind: RegistryMirrorConfig
name: registry.k8s.io
endpoints:
- url: https://registry.mgmt.lab.internal/v2/proxy-registry.k8s.io
overridePath: true
---
apiVersion: v1alpha1
kind: RegistryMirrorConfig
name: quay.io
endpoints:
- url: https://registry.mgmt.lab.internal/v2/proxy-quay.io
overridePath: true
Install the Talos Cluster
Generate Talos configs
Create the Talos cluster configuration with your custom patches and install image:
talosctl gen config talos-proxmox-cluster https://10.10.100.10:6443 \
--config-patch @lab.yml \
--config-patch @registry_mirror.yml \
--output-dir _out \
--install-image registry.mgmt.lab.internal:9443/metal-installer-secureboot/ce4c980550dd2ab1b17bbf2b08801c7eb59418eafe8f279833297925d67c7515:v1.12.1
Next, upload the Talos ISO to Proxmox. The ISO url can be taken from the Talos Image Factory (see last post). Keep the ISO filename consistent with your OpenTofu config references.
Install the Talos VMs
Now we are ready to provision the last needed VMs via OpenTofu. Ensure both node roles are enabled in your config:
main.tf

Control Plane
resource "proxmox_vm_qemu" "controlplane" {
  name        = "talos-cp-${count.index + 1}"
  target_node = "proxmox2"
  count       = 1
  bios        = "ovmf"
  agent       = 1
  machine     = "q35"
  skip_ipv6   = true

  startup_shutdown {
    order             = 3
    shutdown_timeout  = -1
    startup_delay     = -1
  }

  start_at_node_boot = true
  cpu {
    cores = 4
    sockets = 1
    type = "host"
  }
  memory   = 6144
  scsihw   = "virtio-scsi-pci"
  boot     = "order=scsi0;ide2"

  disks {
    ide {
      ide2 {
        cdrom {
          iso = "local:iso/metal-amd64-secureboot.iso"
        }
      }
    }
    scsi {
      scsi0 {
        disk {
          size     = "64G"
          storage  = "data"
        }
      }
    }
  }

  efidisk {
    efitype = "4m"
    storage = "data"
  }

  network {
    model  = "virtio"
    bridge = "vmbr3"
    firewall = false
    link_down = false
    id = 1
  }

  rng {
    period = 0
    source = "/dev/urandom"
  }

  vga {
    type   = "std"
  }
}

Worker
resource "proxmox_vm_qemu" "worker" {
  name        = "talos-worker-${count.index +1}"
  target_node = "proxmox2"
  count       = 1
  bios        = "ovmf"
  agent       = 1
  machine     = "q35"
  skip_ipv6   = true

  startup_shutdown {
    order             = 4
    shutdown_timeout  = -1
    startup_delay     = -1
  }

  start_at_node_boot = true
  cpu {
    cores = 4
    sockets = 1
    type = "host"
  }
  memory   = 8172
  scsihw   = "virtio-scsi-pci"
  boot     = "order=scsi0;ide2"

  disks {
    ide {
      ide2 {
        cdrom {
          iso = "local:iso/metal-amd64-secureboot.iso"
        }
      }
    }
    scsi {
      scsi0 {
        disk {
          size     = "100G"
          storage  = "data"
        }
      }
    }
  }

  efidisk {
    efitype = "4m"
    storage = "data"
  }

  network {
    model  = "virtio"
    bridge = "vmbr3"
    firewall = false
    link_down = false
    id = 1
  }

  rng {
    period = 0
    source = "/dev/urandom"
  }

  vga {
    type   = "std"
  }
}
Plan and apply the OpenTofu configuration as we did in the second blog post of this series.
Provision the Talos Cluster
Initialise the Control Plane:
talosctl apply-config --insecure --nodes 10.10.100.10 --file _out/controlplane.yamlInitialise the Worker node:
talosctl apply-config --insecure --nodes 10.10.100.11 --file _out/worker.yamlBootstrap the first node:
export TALOSCONFIG=./talosconfig
talosctl bootstrap -n 10.10.100.10 -e 10.10.100.10
Create the kube config
talosctl kubeconfig -n 10.10.100.10 -e 10.10.100.10Check if your cluster works
kubectl get all --all-namespacesIf everything is fine and there are not errors in the output, go on to the next step.
Install Calico
First of all, install the necessary crd elements:
kubectl create -f https://raw.githubusercontent.com/projectcalico/calico/v3.31.3/manifests/operator-crds.yamlNext install the Calico operator:
kubectl apply -f https://raw.githubusercontent.com/projectcalico/calico/v3.31.3/manifests/tigera-operator.yamlNow we need to create the configuration so that Calico is working with PFSense as a BGP Peer:
# calico-installation.yaml
apiVersion: operator.tigera.io/v1
kind: Installation
metadata:
  name: default
spec:
  calicoNetwork:
    linuxDataplane: BPF
    bpfNetworkBootstrap: Enabled
    kubeProxyManagement: Enabled
    ipPools:
      - name: default-ipv4-pool
        cidr: 10.244.0.0/16
        encapsulation: None
        natOutgoing: Disabled
        nodeSelector: all()
    # Enable BGP
    bgp: Enabled

---
apiVersion: operator.tigera.io/v1
kind: APIServer
metadata:
  name: default
spec: {}
# felix.yaml
apiVersion: projectcalico.org/v3
kind: FelixConfiguration
metadata:
name: default
spec:
cgroupV2Path: "/sys/fs/cgroup"
bpfEnabled: true
bpfLogLevel: Info
prometheusMetricsEnabled: true
# bgppeers.yaml
apiVersion: projectcalico.org/v3
kind: BGPPeer
metadata:
  name: pfsense
spec:
  peerIP: 10.10.100.1
  asNumber: 64520
# bgpconfig.yaml
apiVersion: projectcalico.org/v3
kind: BGPConfiguration
metadata:
  name: default
spec:
  asNumber: 64512

  # Required when peering with external routers
  nodeToNodeMeshEnabled: false
  logSeverityScreen: Info
Install the configuration:
kubectl apply -f calico-installation.yaml
kubectl apply -f felix.yaml
kubectl apply -f bgppeers.yaml
kubectl apply -f bgpconfig.yaml
Now wait until Calico provision everything and startup the pods - the output of kubectl get all --all-namespaces should look like this:
NAMESPACE         NAME                                           READY   STATUS    RESTARTS      AGE
calico-system     pod/calico-apiserver-7c7cf45574-jrq6m          1/1     Running   0             32d
calico-system     pod/calico-apiserver-7c7cf45574-xxjsg          1/1     Running   0             32d
calico-system     pod/calico-kube-controllers-7b8cb555c7-hj8br   1/1     Running   0             32d
calico-system     pod/calico-node-fkgwz                          1/1     Running   0             32d
calico-system     pod/calico-node-nwhnf                          1/1     Running   0             32d
calico-system     pod/calico-typha-657d6fc4fb-4lzsl              1/1     Running   0             32d
calico-system     pod/csi-node-driver-kwcv7                      2/2     Running   0             32d
calico-system     pod/csi-node-driver-qjc8h                      2/2     Running   0             32d
default           pod/app-898dbd577-hztxx                        1/1     Running   0             31d
default           pod/helloworld-v1-699c6788b-ffkj7              1/1     Running   0             31d
kube-system       pod/coredns-7859998f6-6xcrk                    1/1     Running   0             32d
kube-system       pod/coredns-7859998f6-ghbmp                    1/1     Running   0             32d
kube-system       pod/kube-apiserver-talos-cp-1                  1/1     Running   0             32d
kube-system       pod/kube-controller-manager-talos-cp-1         1/1     Running   3 (32d ago)   32d
kube-system       pod/kube-scheduler-talos-cp-1                  1/1     Running   3 (32d ago)   32d
tigera-operator   pod/tigera-operator-6447996989-8j56s           1/1     Running   0             32d

NAMESPACE       NAME                                      TYPE           CLUSTER-IP      EXTERNAL-IP   PORT(S)                  AGE
calico-system   service/calico-api                        ClusterIP      10.102.61.204   <none>        443/TCP                  32d
calico-system   service/calico-kube-controllers-metrics   ClusterIP      None            <none>        9094/TCP                 32d
calico-system   service/calico-typha                      ClusterIP      10.105.23.48    <none>        5473/TCP                 32d
default         service/example-service                   ClusterIP      10.108.111.25   <none>        80/TCP                   31d
default         service/helloworld                        LoadBalancer   10.106.229.67   10.50.0.10    5000:31483/TCP           31d
default         service/kubernetes                        ClusterIP      10.96.0.1       <none>        443/TCP                  32d
kube-system     service/kube-dns                          ClusterIP      10.96.0.10      <none>        53/UDP,53/TCP,9153/TCP   32d

NAMESPACE       NAME                             DESIRED   CURRENT   READY   UP-TO-DATE   AVAILABLE   NODE SELECTOR                                AGE
calico-system   daemonset.apps/calico-node       2         2         2       2            2           kubernetes.io/os=linux                       32d
calico-system   daemonset.apps/csi-node-driver   2         2         2       2            2           kubernetes.io/os=linux                       32d
kube-system     daemonset.apps/kube-proxy        0         0         0       0            0           operator.tigera.io/disable-kube-proxy=true   32d

NAMESPACE         NAME                                      READY   UP-TO-DATE   AVAILABLE   AGE
calico-system     deployment.apps/calico-apiserver          2/2     2            2           32d
calico-system     deployment.apps/calico-kube-controllers   1/1     1            1           32d
calico-system     deployment.apps/calico-typha              1/1     1            1           32d
default           deployment.apps/app                       1/1     1            1           31d
default           deployment.apps/helloworld-v1             1/1     1            1           31d
kube-system       deployment.apps/coredns                   2/2     2            2           32d
tigera-operator   deployment.apps/tigera-operator           1/1     1            1           32d

NAMESPACE         NAME                                                 DESIRED   CURRENT   READY   AGE
calico-system     replicaset.apps/calico-apiserver-7c7cf45574          2         2         2       32d
calico-system     replicaset.apps/calico-kube-controllers-7b8cb555c7   1         1         1       32d
calico-system     replicaset.apps/calico-typha-657d6fc4fb              1         1         1       32d
default           replicaset.apps/app-898dbd577                        1         1         1       31d
default           replicaset.apps/helloworld-v1-699c6788b              1         1         1       31d
kube-system       replicaset.apps/coredns-7859998f6                    2         2         2       32d
tigera-operator   replicaset.apps/tigera-operator-6447996989           1         1         1       32d
Install the HAProxy Ingress Controller
Now switch to the HAProxy server and go on with the installation of the external HAProxy ingress controller.
Install HAProxy first
Before we can install and use the HAProxy Ingress Controller the HAProxy itself must be installed. For this we need to add the available repository for Ubuntu:
sudo add-apt-repository ppa:vbernat/haproxy-3.2
sudo apt update
sudo apt install haproxy=3.2.\*
sudo systemctl stop haproxy
sudo systemctl disable haproxy
Take care of disabling the HAProxy service, because it can't coexist with the HAProxy ingress controller.
Install HAProxy Ingress Controller
The Ingress Controller needs a working Kube config to watch changes from the cluster. It then create or modifies the dynamic haproxy configuration which is the key point of this installation. For the lab, take the kube config from your management client under /ubuntu/.kube
sudo mkdir -p /root/.kube
sudo cp config /root/.kube/config
sudo chown -R root:root /root/.kube
To use port 80 and port 443 with the controller we need to change the cap configuration:
sudo setcap cap_net_bind_service=+ep /usr/sbin/haproxyNow download the appropriate HAProxy ingress controller version. You see the support matrix on this page
wget https://github.com/haproxytech/kubernetes-ingress/releases/download/v3.2/haproxy-ingress-controller_3.2.6_Linux_x86_64.tar.gz
tar -xzvf haproxy-ingress-controller_3.2.6_Linux_x86_64.tar.gz
sudo cp ./haproxy-ingress-controller /usr/local/bin/
Create the file /lib/systemd/system/haproxy-ingress.service with the following content:
[Unit]
Description="HAProxy Kubernetes Ingress Controller"
Documentation=https://www.haproxy.com/
Requires=network-online.target
After=network-online.target

[Service]
Type=simple
User=root
Group=root
ExecStart=/usr/local/bin/haproxy-ingress-controller --external --configmap=default/haproxy-kubernetes-ingress --program=/usr/sbin/haproxy --disable-ipv6 --ipv4-bind-address=0.0.0.0 --http-bind-port=80 --ingress.class=haproxy
ExecReload=/bin/kill --signal HUP $MAINPID
KillMode=process
KillSignal=SIGTERM
Restart=on-failure
LimitNOFILE=65536

[Install]
WantedBy=multi-user.target
Enable and start the service
sudo systemctl enable haproxy-ingress
sudo systemctl start haproxy-ingress
Install Bird
Bird is the internet routing daemon which gives the HAProxy Ingress controller the routes for the configuration.
sudo add-apt-repository -y ppa:cz.nic-labs/bird
sudo apt update
sudo apt install bird
Edit configuration under /etc/bird/bird.conf:
router id 172.16.100.10;
log syslog all;

# control plane node
protocol bgp {
   local 172.16.100.10 as 64513;
   neighbor 172.16.100.1 as 64520;
   # direct connection
   direct;
   import all;
   export none;
}

# Inserts routes into the kernel routing table
protocol kernel {
   scan time 60;
   export all;
}

# Gets information about network interfaces from the kernel
protocol device {
   scan time 60;
}
Enable and start the Bird service:
sudo systemctl enable bird
sudo systemctl restart bird
Check the status with sudo birdc show protocols:
BIRD 1.6.8 ready.
name     proto    table    state  since       info
bgp1     BGP      master   up     2026-01-28  Established
kernel1  Kernel   master   up     2026-01-28
device1  Device   master   up     2026-01-28
The routes from Talos should show up to in the routing table and the dynamic haproxy.conf:
ip r

default via 172.16.100.1 dev eth0 proto static
10.244.9.128/26 via 172.16.100.1 dev eth0 proto bird
10.244.251.0/26 via 172.16.100.1 dev eth0 proto bird
172.16.100.0/24 dev eth0 proto kernel scope link src 172.16.100.10

grep 10.244 /tmp/haproxy-ingress/etc/haproxy.cfg

server SRV_1 10.244.251.8:8080 enabled
Deploy an example app
Switch to the management client again. Before deploying the demo app, we need to install the custom ingress class for the HAProxy ingress controller:
# haproxy-ingress.yaml
apiVersion: networking.k8s.io/v1
kind: IngressClass
metadata:
name: haproxy
spec:
controller: haproxy.org/ingress-controller/haproxy
Apply it with kubectl apply -f haproxy-ingress.yaml
Create a deployment for the app:
# demoapp.yaml
apiVersion: apps/v1
kind: Deployment
metadata:
  labels:
    run: app
  name: app
spec:
  replicas: 1
  selector:
    matchLabels:
      run: app
  template:
    metadata:
      labels:
        run: app
    spec:
      containers:
      - name: app
        image: jmalloc/echo-server
        ports:
        - containerPort: 8080
        readinessProbe:
          httpGet:
            path: /
            port: 8080
          initialDelaySeconds: 5
          periodSeconds: 5
          successThreshold: 1
---
apiVersion: v1
kind: Service
metadata:
    name: example-service
spec:
    selector:
      run: app
    ports:
    - name: http
      protocol: TCP
      port: 80
      targetPort: 8080

---
apiVersion: networking.k8s.io/v1
kind: Ingress
metadata:
  name: example-ingress
  # needed for older HAProxy Ingress versions!
  #annotations:
  #  haproxy.org/ingress.class: "haproxy"
spec:
  ingressClassName: haproxy
  rules:
  - host: "echo.example.com"
    http:
      paths:
      - path: /
        pathType: Prefix
        backend:
          service:
            name: example-service
            port:
              number: 80
Edit /etc/hosts on the management client:
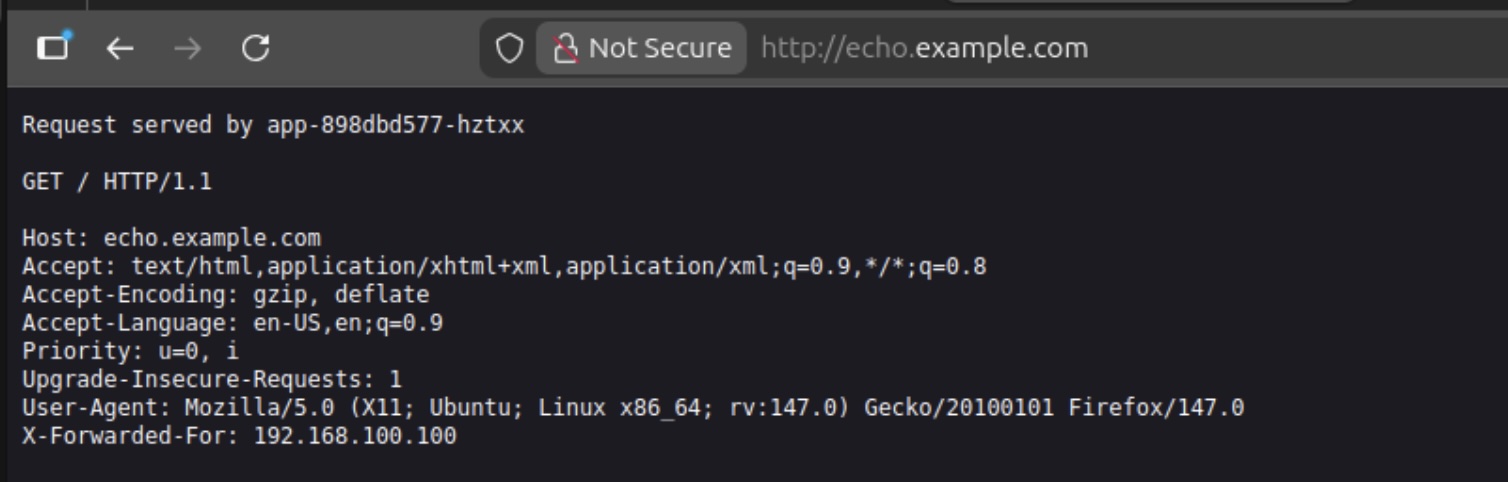
172.16.100.10 echo.example.comNow you can start your browser and call http://echo.example.com
Ready for more
We have successfully finished the installation of a Talos Cluster on premise with a connected registry which is on premise too. The cluster don't has a direct connection to the internet and the registry is caching needed images. Furthermore the Talos images which are needed to operate the Talos cluster are co signed and the bootstrap Talos image is using or own secure boot keys. In ongoing blog posts I'll show how to update the cluster with updated images and enhance the productivity with an administration ui and observability functionality.
Common Pitfalls (Worth checking early)
- Installer image url typos
- Wrong file path for worker config (`_out/worker.yaml`)
- ISO filename mismatch between Proxmox and OpenTofu config
- Forgetting to create `IngressClass` before applying app Ingress objects
- Applying Calico custom resources before operator/CRDs are ready
Quick validation checklist
talosctl healthreports healthy control plane and workerkubectl get nodesshows all nodes `Ready`- Calico pods are running in `calico-system` / `tigera-operator` namespaces
- Ingress controller pods/services are healthy
- Example app ingress is admitted and reachable
That's all for now. Stay tuned and leave me a comment on LinkedIn for any problems or suggestions you have.
Related posts:
You should also read:

Highly separated Talos Kubernetes Cluster: Part 3 - Registry installation
Welcome back to another part of building an highly separated Talos Kubernetes cluster! In this part we will install the internal registry which avoids the direct connection to the internet for the Talos cluster. Furthermore, the Talos image factory will be hosted on premise too,…
Continue reading...
Highly separated Talos Kubernetes Cluster: Part 2 - VM installation
Welcome back to our series on building an highly separated Talos Kubernetes cluster! In this second instalment, i'll focus on preparing your Proxmox environment. This involves creating a Proxmox image template for the Ubuntu VMs, downloading necessary images for the management client, and setting up…
Continue reading...
Highly separated Talos Kubernetes Cluster: Part 1 - Overview
Welcome to the overview of a series on building an Talos Kubernetes cluster with enhanced security. This journey will take you through every step, from setting up the initial infrastructure to deploying a fully functional demo application. In this introductory post, we'll discuss why I'm…
Continue reading...