Highly separated Talos Kubernetes Cluster: Part 1 - Overview

Welcome to the overview of a series on building an Talos Kubernetes cluster with enhanced security. This journey will take you through every step, from setting up the initial infrastructure to deploying a fully functional demo application. In this introductory post, we'll discuss why I'm undertaking this project, the benefits it offers, and outline the developed architecture as well as necessary software and hardware components.
Highly separated not air-gapped
An air gap is a security measure that involves isolating a computer or network and preventing it from establishing an external connection. An air-gapped computer is physically segregated and incapable of connecting wirelessly or physically with other computers or network devices.
In the last years the term "air-gapped" has been mistakenly used for systems who tried to minimise the attack vector through eliminating the direct connection to the internet.
In the modern world, almost nothing is air gapped in the original sense of the word, except for maybe some Safety Instrumented Systems, and the occasional CPU on a power drill, saw or other power tool. Security practitioners who use the word “air gap” to describe their connected networks are sowing confusion. Stop it.
So, I'm going to use the term "highly separated" for the rest of this blog series to reflect an enhanced security pattern used for this architecture.
Why am I doing it?
In today's rapidly evolving IT landscape, security and isolation are paramount. A Kubernetes cluster within a dedicated network and internal set up registries provides an additional layer of security by moving the services away from external access points. This setup is particularly useful for organisations handling sensitive data or operating in highly regulated industries.
What are the benefits?
Enhanced Security: By using strict rules to move the cluster away from other networks, we reduce potential attack vectors.
Compliance: Many regulations require strict separation of systems handling sensitive information.
Performance: Dedicated resources can lead to more predictable and consistent performance for applications running within the cluster.
What am I going to do?
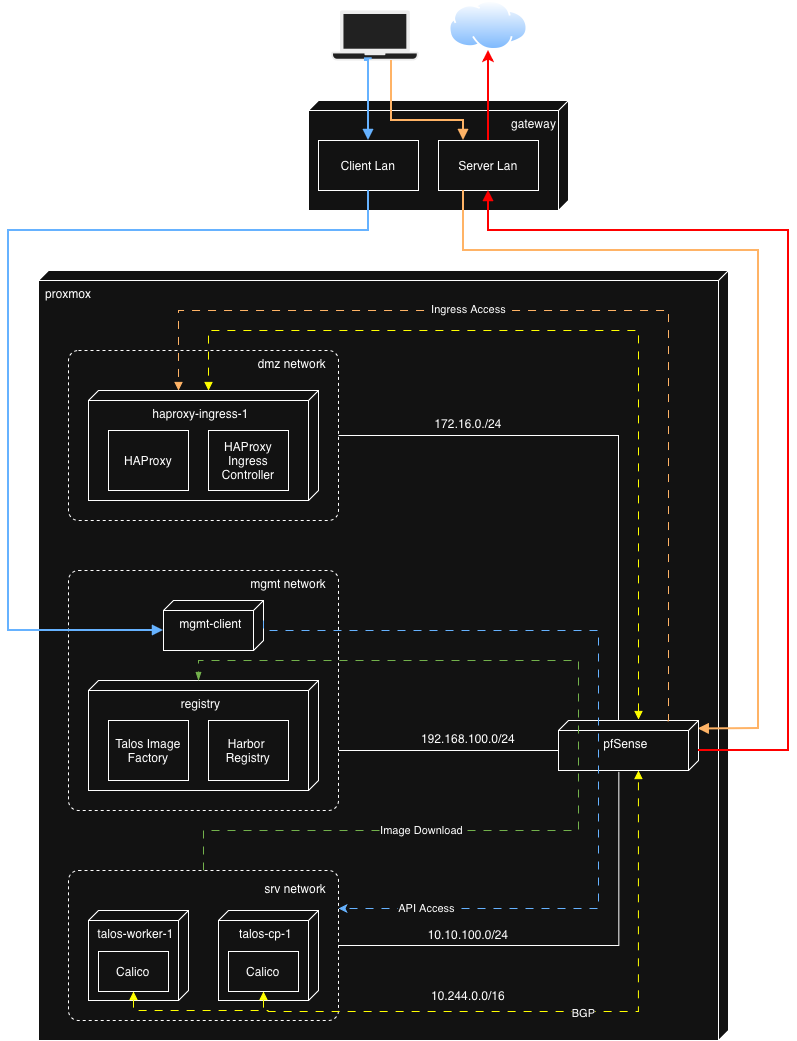
So what do we see here? First of all three networks are defined in Proxmox to support the Kubernetes deployment in this lab:
- DMZ - houses the HAProxy and HAProxy Ingress Controller and is used for external traffic to our example application after successful installation
- MGMT - is used for redirect necessary registry traffic and Talos internal image factory functionality. It takes care that Talos has no need to connect to the internet to get the needed images. Furthermore, the management client is installed here to have a convenient place for installation, both through cli and browser gui
- SRV - is reserved for the TALOS cluster installation only.
All defined networks are secured by pfSense which takes care that only necessary and allowed traffic goes through. The detailed firewall config will be discussed in later parts of this series.
Out of scope is the network out of Proxmox. The assumption is that you will have two separated lan (vlan or else) definitions to work with. One client lan to get into the management client seamlessly and one server lan where the WAN traffic from pfSense goes through and ingress traffic flows in.
Based on my research the setup will involve the following software components.
Proxmox VE
Proxmox VE is built on open-source principles, fostering a community-driven approach that ensures continuous security, improvement and innovation. This openness is a perfect fit for the setup I like to implement. Additionally, Proxmox VE offers comprehensive backup and replication solutions to safeguard your data against loss or corruption.
OpenTofu
For the VM proviosioning I had to decide between Terraform and OpenTofu. I've chosen OpenTofu because it is fully open-source, which means you have complete transparency into how it works. This can be crucial for security-conscious organizations. Furthermore it encourages contributions from a wider community, potentially leading to faster bug fixes and new features.
pfSense
pfSense is my preferred choice for separating and controlling network traffic in several ways:
Network segmentation: pfSense allows me to connect multiple, isolated network segments within a single physical network infrastructure in a virtualised environment like Proxmox. This helps prevent broadcasts between networks, reducing congestion and improving security.
Firewall control: With the integrated stateful firewall, I can define granular rules for traffic flow between these segments. I can allow or block specific ports/protocols, restrict access based on source/destination IP, and even shape bandwidth to prioritize critical services.
Additional Services: pfSense includes several additional features like dhcp dns resolver and BGP support. These help to bundle the needed functionality in one point.
Centralized Management: pfSense provides a web-based GUI for managing all these features from a central location. This makes it easier to maintain consistency across multiple networks.
Cost-Effective: Since the firewall is open-source, I can run it on affordable hardware or virtual machines, making it a cost-effective solution compared to commercial alternatives.
In essence, pfSense gives me the tools and control I need to design this secure, efficient network architecture tailored to my specific requirements.
Ubuntu
Not much to say here. It is my preferred Linux distribution to work with. Im going to use it as a Management client to manage the entire setup from one host and it is additionally used to set up the bastion host (Harbor and HAProxy).
Harbor
Harbor is an open-source cloud-native registry that stores, signs, and scans container images for vulnerabilities. It provides advanced features like content signing, image replication, and role-based access control (RBAC). With Harbor, I can securely store Docker and OCI images and ensure their integrity through cryptographic signatures. Furthermore, it is possible to activate vulnerability scanning on uploaded images. These security aspects are crucial to complete the air gapped architecture for Talos. The integrated web portal offers a user-friendly interface for managing repositories, while the included API enables integration for future use CI/CD pipelines.
Talos
Coming from OpenShift in my professional work environment I was stunned by Talos regarding security and simplicity. I decided to go for Talos because of:
- Minimal attack surface: Talos is a minimal, immutable operating system that only includes essential components for running Kubernetes. This reduced attack surface minimises potential vulnerabilities and makes the system easier to secure.
- Immutable infrastructure: Since Talos uses an immutable infrastructure model, changes are made through atomic updates, ensuring consistency and reducing the risk of configuration drift or human error introducing security flaws.
- Simplified security updates: Talos simplifies the process of patching and updating the system, which means critical security patches can be applied quickly without complex installation steps, keeping the cluster nodes secure against known vulnerabilities.
- Strong default security posture: Out of the box, Talos enforces strong security practices like read-only root filesystems, mandatory use of cryptographic signatures for updates, and strict security policies. This minimises misconfigurations that could lead to security issues.
HAProxy
HAProxy is renowned for its high performance, reliability, and low resource consumption. It's designed to handle a large number of connections efficiently, making it ideal for managing incoming traffic at scale. Its advanced load balancing algorithms (round-robin, least connections, etc.) in combination with the build-in SSL/TLS support allows us to distribute traffic intelligently across backend services, ensuring optimal use of resources and improved application performance. On top of that it delivers enhanced security services like allow-/denylisting, rate limiting and DDoS protection.
HAProxy as an Ingress controller integrates seamlessly with Kubernetes, enabling dynamic updates based on Kubernetes Ingress resources. This allows for easy management of application routes directly within the Kubernetes ecosystem and makes this component a vital part in the cloud native architecture.
Calico
Calico is an open-source networking solution designed to provide low-latency, high-performance network connectivity for containers by leveraging the Linux kernel for routing packages. Unlike some CNI solutions that rely on encapsulation (like VXLAN or IPIP), Calico can use pure Layer 3 routing. This reduces overhead and allows for better performance, especially in large-scale environments. The final and most important part is BGP. By integrating BGP (Border Gateway Protocol), Calico enables efficient routing of traffic across different networks, which is essential for the planned architecture.In the end it will be a perfect fit to the HAProxy counterpart.
Next steps
Now that we nailed down the architecture and the used components, it is time to prepare the most important part of this setup.
To get started, you'll need:
- Proxmox VE installed on a physical server or virtual machine
- Internet access to the necessary ISO images and software packages.
- A reliable network setup with appropriate subnets and/or VLANs.
In subsequent posts over the next weeks, I will delve into each component in detail. Stay tuned for our next post, where we'll guide you through preparing your Proxmox environment!
Being a non native English speaker, some parts of this text have been written with the support of artificial intelligence.
Discuss or comment this post on LinkedIn
Related posts:
Highly separated Talos Kubernetes Cluster: Part 2 - VM installation
You should also read:

Highly separated Talos Kubernetes Cluster: Part 4 - Talos Cluster installation
In this part, we install Talos on Proxmox VMs, bootstrap the cluster, enable networking with Calico, and prepare HAProxy Ingress in external mode. Before starting, make sure you already read through the other blog posts of this series: Before we can install the Talos cluster…
Continue reading...
Highly separated Talos Kubernetes Cluster: Part 3 - Registry installation
Welcome back to another part of building an highly separated Talos Kubernetes cluster! In this part we will install the internal registry which avoids the direct connection to the internet for the Talos cluster. Furthermore, the Talos image factory will be hosted on premise too,…
Continue reading...
Highly separated Talos Kubernetes Cluster: Part 2 - VM installation
Welcome back to our series on building an highly separated Talos Kubernetes cluster! In this second instalment, i'll focus on preparing your Proxmox environment. This involves creating a Proxmox image template for the Ubuntu VMs, downloading necessary images for the management client, and setting up…
Continue reading...